How I Built My Rastrocam
Note: click on the mini-photos or hypertext links to get the full
sized photo with caption.
 Several people have asked me how I built my Rastrocam (rearward
looking Astrocam). I pretty much followed the ideas put forth in
Advanced Model Rocketry, Second Edition, compiled by Michael
A. Banks. This book is published by Kalmbach Books and includes
information about high power rocketry, scale, launch control systems,
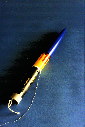
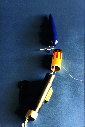
and many other things, including rocket-borne photography. The picture at left shows my Rastrocam. The picture at right shows an 'exploded view'.
As you can see, it's a standard Estes Astrocam, only it's mounted
upside down. I cut a piece of body tube from the carrier rocket and
topped it with a Maniac nose cone. A length of elastic shock cord
ensures it will stay with the camera. I glued a
Several people have asked me how I built my Rastrocam (rearward
looking Astrocam). I pretty much followed the ideas put forth in
Advanced Model Rocketry, Second Edition, compiled by Michael
A. Banks. This book is published by Kalmbach Books and includes
information about high power rocketry, scale, launch control systems,
and many other things, including rocket-borne photography. The picture at left shows my Rastrocam. The picture at right shows an 'exploded view'.
As you can see, it's a standard Estes Astrocam, only it's mounted
upside down. I cut a piece of body tube from the carrier rocket and
topped it with a Maniac nose cone. A length of elastic shock cord
ensures it will stay with the camera. I glued a  JT-55 stage coupler to the nose of the Astrocam to
allow it to fit into the rocket's body tube and cut a notch in the
coupler to serve as the shutter string holder. Since the regular
shutter string is too short, I tied a
JT-55 stage coupler to the nose of the Astrocam to
allow it to fit into the rocket's body tube and cut a notch in the
coupler to serve as the shutter string holder. Since the regular
shutter string is too short, I tied a  length of shroud line to the Astrocam string. I drilled a
small hole in the body tube segment,
lined it up with the slot in the base of the camera, and passed the
lengthened shutter string through to the
other side.
length of shroud line to the Astrocam string. I drilled a
small hole in the body tube segment,
lined it up with the slot in the base of the camera, and passed the
lengthened shutter string through to the
other side.
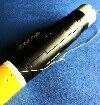 For flight, I load the film into the camera following the instructions
that came with the Astrocam. I then use electrical tape to seal the
film door. I not only run tape along the long edges of the door, I
also run a piece of tape around the join line of the camera and the
nose cone's body tube. This tape makes sure that the body tube won't
twist and bind the shutter string. (I suppose you could glue the
body tube to the camera, but then it wouldn't be easy to replace if it
gets banged up.) Make sure the string can move freely! A length of
tape around the bottom completes the encapsulement of the camera. I
attach the Maniac nose cone to the shock cord and put it on top of its
body tube to complete the flight
configuration. Well, not exactly... I also attach a 12 inch
parachute to the shock cord attached to the base of the Rastrocam.
Now, it's ready to go.
For flight, I load the film into the camera following the instructions
that came with the Astrocam. I then use electrical tape to seal the
film door. I not only run tape along the long edges of the door, I
also run a piece of tape around the join line of the camera and the
nose cone's body tube. This tape makes sure that the body tube won't
twist and bind the shutter string. (I suppose you could glue the
body tube to the camera, but then it wouldn't be easy to replace if it
gets banged up.) Make sure the string can move freely! A length of
tape around the bottom completes the encapsulement of the camera. I
attach the Maniac nose cone to the shock cord and put it on top of its
body tube to complete the flight
configuration. Well, not exactly... I also attach a 12 inch
parachute to the shock cord attached to the base of the Rastrocam.
Now, it's ready to go.
Rocket/Whoosh Generator Selection
For a carrier rocket, I've used both the Delta II and the Maniac. One
of these days, I'll build a Fred Williams Astrocam carrier and try it.
I've never gotten a usable photo from a regular Astrocam with the
Maniac, since the delays aren't long enough, but a D12-5 and D12-7
have yielded ground shots with the Rastrocam every time. A D12-3
shouldn't be used, unless the rocket will be traveling almost straight
up during the coasting period. If it's moving with any sort of
groundspeed, you'll get blurred shots. I've gotten good results with
B6-2, C6-3, and C6-5 WGs and the Delta II carrier. Don't use
an A8-3! You can throw the rocket higher than it'll go on that
motor.
Flight Prep
I don't recommend using cellulose insulation as wadding with the
Rastrocam, unless you want to see a bunch of white streaks all over
your photos... I use the 'toilet paper' type of wadding instead. I
then insert the rocket's parachute and pack the Rastrocam's chute on
top. Then, making sure that the safety shutter is closed, I cock the
camera by pulling the string through the notches in the stage coupler
and hold it tight while placing the Rastrocam on the rocket. Once
it's seated, I can let go of the string. Then I place it on the
launch pad, attach the clips to the ignitor, and open the
safety shutter. Now it's ready to fire. Say "cheese!"
Rastrocam launch reports

Sven Knudson
NAR#63297
sven@ninfinger.org
