|
Part 2: Redstone Conversion
In 1959 an advanced version of the Army's Medium Range Ballistic
Missile (MRBM) Redstone was chosen as America's first manned launch
vehicle. Originally called "Jupiter C" this version had sufficient
performance to satisfy the mission requirements for the ballistic
flight of the Mercury Program. The Jupiter C had lenghtened
propellant tanks, lighter structure, and engine modifications to
permit longer burning time. Further adaptation, however, was
necessary to satisfy the manned mission. The major external
modification ws the development of a new instrument section, called
the aft unit. This section contained the pressurized instrument
compartment, including flight control-sensing and abort systems,
booster telemetry antennas and ballast. Attached to the top of the aft
unit was a short spacecraft/booster adaptor. Out of a total of eight
Mercury Redstone vehicles, five were launched. The first three were
unmanned and were called the Qualification Flight Test Program. After
the first two manned flights, the rest were cancelled.
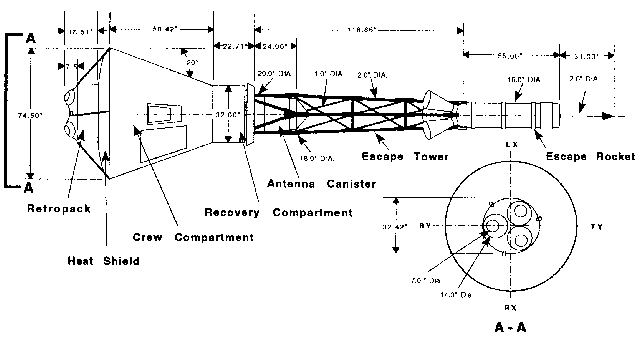
 The total length of the Mercury Redstone stack was 83.38 feet which I
rounded down to 83.333 feet, or 83' 4" for the purpose of building the
model. 288 inches (24 feet) is taken up with the Mercury stack: from
the tip of the escape tower to the widest point of the heat shield.
The Monogram kit scales out very well in this respect. The
spacecraft/booster adaptor is a frustum 7 inches long with the
diameter tapering from 74.5 inches at the top to 70 inches at its
base. The instrument section is 140.5 inches long, propellant tank
section is 450 inches, and the propulsion section is 110.75 inches in
length. There are two noticeable seams in the stack, the first at
1.25 inches is between the instrument section and the propellant
tanks. The second is between the propellant tanks and the propulsion
section and is 2.5 inches tall. The diameter of the instrument,
propellant and propulsion sections is 70 inches while the maximum
diameter at the stabilizing fins is 152 inches.
The total length of the Mercury Redstone stack was 83.38 feet which I
rounded down to 83.333 feet, or 83' 4" for the purpose of building the
model. 288 inches (24 feet) is taken up with the Mercury stack: from
the tip of the escape tower to the widest point of the heat shield.
The Monogram kit scales out very well in this respect. The
spacecraft/booster adaptor is a frustum 7 inches long with the
diameter tapering from 74.5 inches at the top to 70 inches at its
base. The instrument section is 140.5 inches long, propellant tank
section is 450 inches, and the propulsion section is 110.75 inches in
length. There are two noticeable seams in the stack, the first at
1.25 inches is between the instrument section and the propellant
tanks. The second is between the propellant tanks and the propulsion
section and is 2.5 inches tall. The diameter of the instrument,
propellant and propulsion sections is 70 inches while the maximum
diameter at the stabilizing fins is 152 inches.
Because the Jupiter C was shorter than the Mercury Redstone stack, two
Glencoe Jupiter C kits were necessary to complete this conversion. I
started by taking parts 11 R/L and 12 R/L and glued them all together.
Then I measured up from the bottom 450 scale inches and took my razor
saw and carefully cut through the cylinder. After sanding the edge
square, a styrene strip about 1/4" tall was added around the inside of
the cylinder. This gave a solid flange for attaching the instrument
section. Then parts 11 R/L from the second kit were glued together,
adn cut at 140.5 scale inches from one end to make the instrument
section. By the way, the cylinder diameter of the Glencoe kit is two
inches over scale (72 inches). The next step was to scribe and cut
all external details into the propellant section. The fuel and
oxidizer fill and drain and oxidizer vent orifices were drilled and
filed out of the propellant section. A backing of sheet and tube
styrene was fashioned for the fill and drains while a short piece of
1/8" styrene tube was used to back the oxidizer vent. The instrument
section also had all major hatches scribed into it. Because I intended
to model the launch pad umbilical masts, the umbilical door was cut
out of the instrument section: this was backed by a piece of sheet
styrene.
The next area tacked was the propulsion section, including the
stabilizing fins and engine exhaust nozzle. This section of the kit
has several scale problems. The cylindrical part measures 89 scale
inches long, while it should be 94.75 scale inches. This also affects
the length of the fins as they start from the top of the section and
continue for 110.75 scale inches. The kit fins scale out to 105
inches. The diameter across the fins is also off, while the
aerodynamic rudders scale out very nicely, being only one scale inch
under in width. The diameber across the fins minus the rudders
measures out at 128 scale inches -- it should be 114 scale inches. I
decided not to fix any of this in my conversion as it would mean
scratch-building a completely new propulsion section with fins and a
new launch base.
Parts 13 R/L make up the cylindrical portion of the propulsion
section. Part 13L has a hatch scribed into the side about halfway up.
I scribed a similar hatch into part 13R so that when the two parts
were glued together the hatches were opposite one another. (Adding a
0.005" thick panel around both hatch areas and rescribing the hatches
would be more accurate.) The hydrogen peroxide fill valve was then
created in the top of part 13L by cutting out the rectangle and
building an indented box with 0.010" sheet plastic. The turbine
exhaust pipe was added to part 13R by thinning a piece of Evergreen
3/16" styrene tube, drilling a hole in the bottom of the part and
inserting the tube. Parts 13R/L were then glued together. Next the
fin halves, Parts 21 and 24 were assembled, making four sets. Prior
to the fins being fixed to the propulsion section, the leading edge
was filed and sanded to scale thickness. The aerodynamic rudders
(parts 23) had sink holes that were filled, the upper edge was filed
to a fine edge, and the retaining ring removed from the pivot pin.
The engine nozzle was used after a new retaining ring was fabricated
to fit the bottome of the propulsion section. The nozzle and ring,
carbon vanes and aerodynamic rudders were fitter after the final
assembly of the booster stack to the launch base.
Next, the Spacecraft/Booster Adaptor was created out of three
concentric rings of 0.040" styrene stock glued together and the edges
carefully filed to a taper. The ring was constantly test fitted to
the instrument section and bottom of the spacecraft. The inside of
the ring was filed out to accept the spacecraft heatshield. I ended
up with a ring that was 0.040" larger than the heatshield at the top.
Enough plastic was left inside the ring to drill three holes for piano
wire locator pins to attach the Mercury spacecraft. This was done by
gluing the heatshield to the adaptor with white glue, drilling three
0.010" holes down through the heatshield into the adaptor. The
heatshield was then removed and piano wire pins were inserted into the
adaptor. The reason the adaptor was built 0.040" oversize at the
heatshield was to accept a 0.020" by 0.040" band of styrene that
encircled the base of the spacecraft, representing the clamp ring. I
attached the spacecraft/booster adaptor to the instrument section with
a 0.010" concentric ring to represent the flanges that are used to
bolt the two elements together.
The last major subassembly was the launch base, steps one through five
in the instructions. All four base support legs (part 2) were cleaned
up and attached to the base ring (part 1). The blast deflector (part
3) was also cleaned up. The kit had lots of flash and mold marks on
most of the parts. I decided to modify the rotating ring (part 4) by
removing the gear teeth and replacing them with a 0.010" by 0.060"
styrene strip collar. I scratch-built two umbilical mast receptacles.
These were made from Plastruct 1/8" ABS round tubing. I cut two
pieces 1/4" long and shaped them to look like a collared pivot hinge,
retaining enough plastic to support the actual mast. Then I glued
these to a base and secured them to the bottom of part 1. Because of
the modifications to part 4, I didn't use parts 5 or 6, but glued the
upper launch ring to the base ring. Parts 8, 9, and 10 were cleaned
up and modified by drilling out holes to accept 0.025" styrene rod and
two pound test monofilament. Part 7, the main relay box, was not
used: I couldn't find any photos which showed this item attached to
this type of Redstone launch base. Some added do-dads were scrounged
from the spares box and placed around the outer base of the launch
ring. Four pipe conduits were scratch-built out of Plastruct 1/4" ABS
round tubing. These would be placed around the edge of the base. The
actual umbilical masts were scratch-built from Evergreen 1/8" styrene
tube and parts from the spares box. The flexible hose was created
with tungsten lamp filament supported by 0.025" styrene rod. I found
that I could superglue these items together after carefully bending
the rod into its general configuration.
I then took a 6" by 6" plywood base and added a 0.040" styrene
top. The major subassemblies of the launch base were painted with
Floquil Gunmetal. The sheet styrene base itself was painted Floquil
Cement and the the blast deflector was glued to the base. The launch
ring assembly ws then attached to the deflector and most of the
support equipment was added to the base. I left the umbilical masts
themselves off until after the launch vehicle was attached. The
launch base was then weathered with pastel chalk and simulated oil
stains. The major subassemblies of the launch vehicle were then
painted. I used Testors Model Master Med. Gray for the primer coat
and Gloss White for the base coat. I masked off the propulsion
section for the tracking markings and painted them with Testors Flat
Black. The checkerboard markings on the instrument sections were
applied with Microscale Black Decal Sheet as was the stripe around the
middle of the propellant tanks. The MR 7 at the base of the tanks was
pieced together using Micro Scale Sheet No 87-70-2 R.R. Gothic Letters
& Numbers Black. (Note: The MR 7 which is seen on all four of the
sides at the bottom of the propellant tanks refers to this particular
Redstone booster, it being booster number 7. Grissom's flight,
designated MR-4 by NASA, had MR 8 on its booster.) The red UNITED
STATES on the sides came from Letraset 36 pt. Helvetica Medium Number
2120 Dry Transfer Sheet. The letters are a little small, but were as
close as I could find. To apply these I took each letter and rubbed
it onto a clear decal sheet. I then cut out each letter from the decal
sheet and applied it to the side of the propellant section using
Microscale Micro Set sparingly. If too much is used the dry transfer
ink will run. The blast shields on the base of the propulsion section
sere covered with silver decal sheet. After all these sections were
dry a final coat of Microscale Micro Satin was airbrushed onto the
model. The booster subassemblies were then glued together and attached
to the launch base. The Mercury spacecraft minus the escape tower
assembly was attached to the adaptor with epoxy cement. The
spacecraft/booster umbilical covers and clamp ring covers were added
with superglue, the umbilical covers having been prepainted flat
black. The clamp rings were covered with red decal sheet cut to the
proper witch and length and set down with lots of Microscale Micro Sol
so they would conform to the plastic's shape.
 The launch umbilical masts were stiffened with 0.040" piano wire and
glued to the launch base. I also used 0.010" piano wire to attach the
spacecraft umbilical mast to the booster at the top of the propellant
section. The pressurization lines of the booster umbilical mast were
then secured in the umbilical door opening that was cut into the
instrument section. The last of the conduit lines feeding the
umbilical masts were added to the base of the launch base. The final
task was to attach the escape tower assembly to the top of the
spacecraft. The astronaut figure on the pad was placed to give the
model a sense of scale. The figure is a composite of the astronaut
head and helment from the Monogram kit, the torso and legs from
Monogram's F-15 ground crewman and the arms from one of the figures
included in the Glencoe kit.
The launch umbilical masts were stiffened with 0.040" piano wire and
glued to the launch base. I also used 0.010" piano wire to attach the
spacecraft umbilical mast to the booster at the top of the propellant
section. The pressurization lines of the booster umbilical mast were
then secured in the umbilical door opening that was cut into the
instrument section. The last of the conduit lines feeding the
umbilical masts were added to the base of the launch base. The final
task was to attach the escape tower assembly to the top of the
spacecraft. The astronaut figure on the pad was placed to give the
model a sense of scale. The figure is a composite of the astronaut
head and helment from the Monogram kit, the torso and legs from
Monogram's F-15 ground crewman and the arms from one of the figures
included in the Glencoe kit.
This conversion took about 230 hours to complete. Most of that time
was taken up with modifying the Mercury end of the project and
creating the scratch-built areas. As is usual, even more time was
spent on research. I made a trip to the Lyndon B. Johnson Manned
Spaceflight Center in Houston, Texas, where one of the remaining
Mercury Redstone boosters is on display, so I took lots of photos and
measurements. Overall, I was very pleased with the outcome of the
project and the model took first place in the Real Spacecraft category
and Best Spacecraft in Show at the 1992 IPMS/USA Nationals in
Seattle.
Reference List
American Rocket Society
Spaceflight Report to the Nation
New York Coliseum October 9-15, 1961
Jerome B. Hammack and Jack Heberic
Langley Air Force Base, Virginia
Avation Week and Space Technology
Sept. 21, 1959, Nov. 28, 1960, Dec. 5, 1960,
Dec. 26, 1960, May 8, 1961, May 15, 1961,
May 22, 1961, June 26, 1961, July 22, 1963
Commemorating The First United States Manned Space Flight
The Launch Operations Directorate
NASA 1961
The Encyclopedia of U. S. Spacecraft
By Bill Yenne
Exeter Books 1985
The History of Manned Spaceflight
By David Baker, Ph.D.
Crown Publishers 1981
The Illustrated Encyclopedia of Space Technology
Chief Author Kenneth Glatland
Harmony Books 1981
The Illustrated History of NASA
By Robin Kerrod
Gallery Books 1986
Life in Space
Editor: Robert Grant Mason
Time-Life Books 1983
Life Magazine
Vol. 49 No. 14 October 3,1960
Vol. 50 No. 18 May 5,1961
Vol. 50 No. 19 May 12,1961
Vol. 50 No. 20 May 19, 1961
The National Air and Space Museum Volume Two Space
By C. D. B. Bryan
Peacock Press-Bantam Books 1979
National Geographic Magazine
Vol. 119, No. 5 May 1961
Vol. 120, No. 3 September 1961
Petersen's Book of Man in Space Volume One
Editor: Al Hall
Petersen Publishing Co. 1974
Project Mercury-A Chronology NASA SP-4001
Prepared by James M. Grimwood
U.S. Government Printing Office 1963
Scale Model Rocketry-Methods and Data for the Historian-Craftsman
By Peter Alway 1990
This New Ocean-A History of Project Mercury NASA SP-4201
By Loyd S. Swenson, Jr,.James M. Grimwood, Charles C. Alexander
U.S. Government Printing Office 1966
We Seven-By the Astronauts Themselves
M. Scott Carpenter, L. Gordon Cooper, Jr., John H. Glenn, Jr.,
Virgil I.Grissom, Walter M. Schirra, Jr., Alan B. Shepard, Jr.,
Donald K. Slayton
Simon and Schuster 1962
|
 Monogram's re-release of Revell's Mercury & Gemini spacecraft in
1/48 scale in the mid '80s brought back a flood of childhood memories
to this spacecadet. I've always had a fascination with manned
spaceflight and this kit in Monogram's short-lived Young Astronaut
Monogram's re-release of Revell's Mercury & Gemini spacecraft in
1/48 scale in the mid '80s brought back a flood of childhood memories
to this spacecadet. I've always had a fascination with manned
spaceflight and this kit in Monogram's short-lived Young Astronaut
 Series rekindled my interest. After purchasing a handful, they sat on
the shelf while other projects occupied my time. Then in 1989 I saw
where Glencoe was going to re-release Hawk's old Jupiter C kit in 1/48
scale. I'd seen the original item at kit collectors' shows, but its
Series rekindled my interest. After purchasing a handful, they sat on
the shelf while other projects occupied my time. Then in 1989 I saw
where Glencoe was going to re-release Hawk's old Jupiter C kit in 1/48
scale. I'd seen the original item at kit collectors' shows, but its
 price had kept me from purchasing, especially if I was going to stick
it together with glue. Anyway, Glencoe's notice gave me an idea: why
not combine the two kits to create a replica of Alan Shepard's historic
flight vehicle (MR-3). I did some basic research and didn't come up
with much. Most of the coffee-table books on manned spaceflight
concentrated on Apollo and the Space Shuttle with Project Mercury
beeing only briefly discussed and the Mercury hardware barely touched,
so I dug deeper.
price had kept me from purchasing, especially if I was going to stick
it together with glue. Anyway, Glencoe's notice gave me an idea: why
not combine the two kits to create a replica of Alan Shepard's historic
flight vehicle (MR-3). I did some basic research and didn't come up
with much. Most of the coffee-table books on manned spaceflight
concentrated on Apollo and the Space Shuttle with Project Mercury
beeing only briefly discussed and the Mercury hardware barely touched,
so I dug deeper.