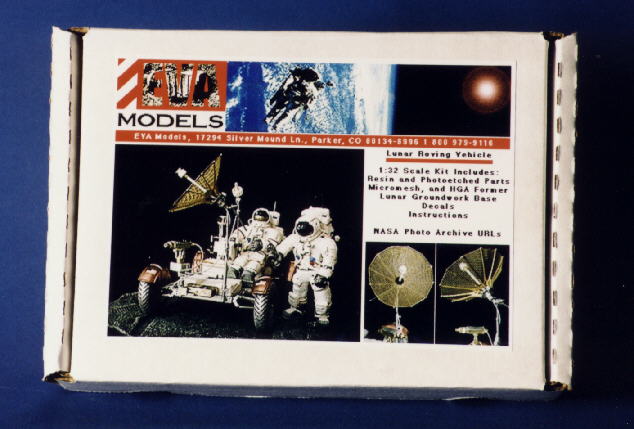
 I met Chris Chulamanis at the 1998 IPMS Nationals in Santa Clara this past July and was very impressed with his new 1/32 scale Lunar Roving Vehicle (LRV). The castings were delicate and crisp and the photo-etched was gorgeous. The kit included two figures as well as the vehicle. The only thing which initially kept me from purchasing the kit was the price, with a family of five, spending $120.00 on one model is very hard for me to do, but there wasn't anything else at the show that I thought was worth throwing my money at so I bought one! As this was my first multi-media kit, the learning curve was, for me, initially a little steep, but I knew that the model had so much potential, so I forged ahead.
Since Sven has a "Quick Look" for the kit elsewhere on this site, I'll not go into all of the neat stuff in the box other than to say that it is jammed full of parts, and some tasks involve very careful assembly. Also, there are many small and delicate parts, so be careful in removing them from their carrier. I found that an X-acto micro saw worked well for me to separate the carrier and parts. There were some minor pin holes in some parts and occasionally in sanding the carrier remnants off of the parts, more were revealed. Most of the holes were filled with Squadron White Filler Putty.

|
| Click on the thumbnail image for more model photos |
Painting the wheels, for me, involved a convoluted, multi-step process, the first of which was to airbrush the entire wheel with Testor's Metalizer Buffing Titanium. Then, without any masks, both the inside and outside wheel disks where airbrushed with Testor's Metal Master Non-Buffing Steel. When dry, a paper mask was created and applied to cover the disks and the steel overspray was again airbrushed with the Testor's Buffing Titanium, this was done one side at a time. The cone-shaped paper mask was held in place with my finger while I sprayed around it. After a day for drying, the outer side of the disk was masked with liquid latex masking fluid, leaving the only center hub unmasked. A new, large paper mask was created to cover the outside of the wheel and cemented to the disk, also using the liquid latex. This left only the hub in the center of the disk exposed and I then airbrushed it with flat white. The next steps after removing the masking were to brush paint the electrical motor housing on the inside of the wheel flat white and brush paint the attachment points for the suspension with Testor's Metalizer Non-Buffing Aluminum. I then took a very small amount of SNJ's aluminum polishing powder on a old cotton shirt, and lightly rubbed over the chevrons to give them a slightly different sheen that the rest of the wheel. The final step for the wheels was to make the white and black markings that go on the outer sides of each wheel disk. This was done by using Scale-Master Sheet #SS-3 White Striping and a draftsman's circle template. A length of white decal was cut to a width of 3/16", the 7/16" circle template was then placed on the decal and a new # 11 X-acto blade was used to cut through the decal stripe. Then the 3/16" circle template was placed in the center of the decal stripe and the circle cut out. Four stripes were made, one for each wheel. The black stripe was made in exactly the same way, using Scale-Master Sheet #SS-2 Black Striping, with the stripe being 3/64" wide.
Removing the resin carrier from the main fenders required careful sawing so that the ridge was left on the fender. I used a dulled #10 X-acto blade to adze the remaining resin after sanding the leftover carrier off. You want the ridge that is under the carrier to match the existing ridge on the out side edge of the fender. All of the fender extensions were left on their carriers for ease of painting and decaling. The color for the fenders was made from Floquil Railroad Colors. I mixed a little Reefer White into Reefer Orange to take the orange down some, then I mixed in some Floquil Tuscan to darken the tint. I matched the color to photos from the September 1973 National Geographic article on Apollo 17, C. D. B. Bryan's The National Air and Space Museum - Volume Two, Space by Peacock Press/Bantam Books 1979, 1982 (This is a paperback edition of part of Mr. Bryan's hard cover book with the same main title) and Robin Kerrod's Spacewalks, put out by Gallery Books in 1985. After all sides of the fender parts were painted with the specially mixed color, the insides of the fenders and the extensions were airbrushed with Testor's Medium Gray and then an overcoat misting of Testor's Gunship Gray. Both front fender dust flaps (part 27) were base painted with Testor's Dark Ghost Gray then over-sprayed with the Medium and Gunship gray on the insides like the rest of the fenders. The American flag decals on the fender extensions were applied over a white decal rectangle 7/32" by 9/64". (See the National Geographic article referenced above.) The final step was to mix Floquil's Gloss and Flat overcoats together in an equal amount to make a semi-gloss coat to spray over the outside surfaces of the fenders and extensions.
Now it was on to the chassis frame, I assembled the forward chassis section (Part 3) with four parts 48 (the torsion bar receptacles) and airbrushed the battery covers flat white, After masking the covers with liquid latex, the frame was airbrushed with Testor's Light Gray and using thinned Testor's Medium Gray, the battery covers were then accented. The rear chassis was assembled (part 2 and the remaining four parts 48), and then both it and part 6 were painted, also with the light gray. After drying, part 6 was attached to the rest of the rear chassis assembly. Next, all of the torsion bars (the .025 styrene rod that goes between the number 48 parts) were attached and brush painted with the Testor's Non-Buffing Aluminum. The center chassis was assembled in the following manner. The Control and Display Pedestal (part 36) was glued to the center chassis (part 1). The joint between the pedestal and chassis frame was filled and after the two outboard hand holds (part 18) were attached, the frame was painted with the light gray. After the frame was masked, the floorboards were airbrushed with the Testor's Non-Buffing Aluminum. To attach the three chassis sections, I super glued the sections together and then drilled a .028 hole through the inside of the center chassis frame into each side frame member of the front and rear chassis assemblies (this would be four holes). I then glued a length of .025 piano wire into each hole to support the weight of rest of the vehicle and the seated crewman. I didn't bother to fair over the holes as they would be covered by the seat assemblies and the footrests. The brackets on the side of the center chassis were painted with flat white and the white and black markings were cut out of decal material, the width being the same as the width of the frame (1/8") and the length being 1/16" for each section of black and white.
The seat parts (12 and 13 for the bottoms and 14, 15 for the backs) were painted separately. There was a little flash on the webbing on the backs, so a lot of care was taken when cleaning the edges of the webbing and the tubular frame as they are very fragile. I used both a small flat file and the before mentioned # 10 X-acto blade to do this. If you want to get ambitious, you can clean the resin from around the bottom seat supports as well, just be very careful if you do! I airbrushed the bottom seats parts flat white and then masked, again with the liquid latex masking agent. I airbrushed both the canvas covering of the seat bottoms and the webbing on the seat backs with Testor's Sand. After drying, the horizontal webbing members on the seat backs were brush painted with Testor's Non-Specular Sea Blue, and the frame was hand brushed with the light gray. The seat parts were then weathered with Testor's Medium Gray and drybrushed with Testor's Camouflage Gray. After drying, the carrier was sanded off of the seat backs and the parts glued together with Pacers's Zap-a-Gap CA glue.
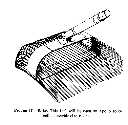
For the assembly of the High-Gain Antenna, I followed Chris' excellent instructions with the following changes. Prior to step one, I painted the groves in the resin former black so that when the wire mesh is applied, the groves are still visible, this will help later in the alignment of the ribs. I then proceeded through step five. In step six, after gluing the inner end of each rib to the etched disc, I only tacked the outer end of the ribs to the wire screen. Then I proceeded to complete steps seven and eight. (You will find that after attaching part 31 to the ribs they are strong enough to survive the removal of the antenna from the former and your chances of gluing the screen to the former is considerably lessened.) After I had attached part 31 to the inner ends of the ribs, I went back and re-attached any rib outer ends that had popped loose. (In my kit, the curvature of the ribs was not quite the same as the curvature of the resin former.) I then proceeded to step ten and cut the antenna off of the former. After it was loose, most of the rib ends had again popped loose, this turned out to be a good thing as I found it much easier to trim the edges of the wire screen without the ends of the ribs being glued down. It was also easier to attach the length of the ribs to the wire screen without the resin former. I could put my finger under the mesh and carefully glue the rib down. After all of the ribs were glued, I carefully brush painted the ribs with the Testor's Non-Buffing Aluminum. I did change the length of the large rod called out in step 7 of the general directions that goes between part 45 and 49 to 1/2" instead of 3/4". This looked a little more to scale based on the LRV lunar surface photos.
I had some discussions with Chris about the ability of the resin "mast" to support the High-Gain antenna. The consensus was that it might be best replaced with something more sturdy. Also, as this model was to be shipped in the mail, I wanted the mast to be strong enough so that the HGA wouldn't have to be repaired after arrival. The new support included a replacement for the short steel rod and was, I felt, more structurally sound. It includes two telescoping steel tubes and a length of .025 K & S steel music wire. The existing resin part was used as a guide in cutting the lengths for the new parts. The larger steel tube is approximately .060 O.D. and .042 I.D., while the smaller tube is about .040 O.D. and .028 I.D. I replaced the small length of .025 steel music wire included in the kit with a longer piece that ran the length of the support.
The Storage Pallet Assembly was built as per step number 4, the only exception was that I painted part 4 light gray instead of flat white. Part 19, the Control & Display Console, was painted flat white, masked, and the face painted flat black. When dry, the dials and switches were drybrushed with Camouflage Gray and the details painted, I used the same color mix for the arm rest as was used on the fenders. The hand Controller (Parts 22A, 22B) was assembled, painted flat white and attached. The Lunar Communications Relay Unit (LCRU, Part 9), after painting the handle white and the left side instrument panel black, was covered with a deep gold foil. The Television Control Unit (TCU, Part 32) and TV Camera (Part 21) also had foil applied after being painted. (The National Geographic article already mentioned has a great photo that shows the TCU and camera very well.) The thermal control mirrors on the TCU and camera were made out of Silver Shrink Mirror from Rosco. If you live in or near a major metropolitan area, check the Yellow Pages for theatrical supply houses and go get yourself a Rosco Designer Products swatch book, it will have small samples (Approximately 1 1/2" by 4") of several products that you might find useful in your modeling, or you can contact Rosco directly. The parts for the 16mm Camera and Low-Gain Antenna were assembled after being painted. The only change being the replacement of the support rod for the Low-Gain Antenna with a piece of .025 steel music wire. Finally the outer wings of the footrests were removed and the footrests were air brushed with Testor's Non-Buffing Aluminum. All of the subassemblies were then set aside until after the chassis and suspension were put together.
To attach the wheels to the chassis I created a jig (1/2" plywood base) and on it, located the wheel base and wheel width and then drilled holes to accept the .050 steel rods that were in the bottom of the wheels. The center of the jig was built up so that the chassis sat 15-1/2 scale inches above the bottom of the wheels and located so that the wheels were in line with the velocity-square dampers (Part 26). The jig center section had the same dimensions as those of the center chassis. The chassis was then spot-glued with Aleen's Tacky Glue directly to the center section of the jig and the wheels were placed into their locator holes. This is why it's important that the locator holes drilled into the bottom of the wheels be as straight as possible, as they will determine the look of the vehicle after the suspension pieces are put on. To complete the suspension was a simple matter of cutting the .035 styrene rod provided in the kit to the correct lengths and adapting the velocity-square dampers to the top of the wheel and chassis. I used Zap-A-Gap to secure all of these parts. The dampers were prepainted while the rods were brushed painted with the non-buffing aluminum after the vehicle was removed from the jig. While the vehicle was still glued to the jig, I attached the fender parts to the wheel. The instruction sheet implies that you do this prior to attaching the wheels to the suspension, but I wanted the fenders to be lined up with the vehicle's local horizon. I used small strips of black shrink tubing cut to 1/32" wide for the runners on the main fender parts. The extensions were then attached to the shrink tube runners. After all suspension parts were applied the tacky glue was wetted and the vehicle carefully lifted off of the jig.
The last steps were to apply all of the subassemblies to the vehicle. I used the jig as support while attaching the seats, control console, footrests, aft equipment rack, antenna assemblies and cameras. I went to an electronics supply store and got the thinnest white insulated wire I could find and used it for the cabling between the antenna, the camera and their control assemblies.
 |
| Click on the image to see more rake images |
The vehicle scales out very well to the documentation that I have. The 90" wheel base measured out exactly, while the distance from between left and right wheels ended up being 75" instead of the 72" that my documentation shows. This was done so that the wheels would sit in the tracks on the lunar landscape supplied with the kit. If one wants to include the hinging mechanisms between the chassis section then some modifications would have to be made to the forward and aft chassis frames to shorten them so that the wheel base remains at 90". The width of each wheel is right on at 9" and the diameter is also correct at 32.19" (Yeah, like I could really measure that .19"!) The finished diameter of my HGA mesh measured out to 33", while the diameter that I have for the real thing says it should be 38". This difference could very well be caused by my construction method as there certainly can be some leeway in the final diameter based on how one attaches the ribs to the center disk. The seats appear to be a bit too wide and the configuration of the seat covers is not the same as the lunar vehicles. This would be very hard to change and I don't think it would be worth the hassle.
While I was building, I did some further research into the LRV and below are some comments about the actual vehicles and the differences between missions and how they differ from the kit.
 |
| Click on the image to see more drawings |
While looking at the Eric M. Jones' Apollo Lunar Surface Journal's image collection on Apollo's 15, 16 and 17, I noticed something which I thought was peculiar. It appears that the four small "brackets" on the sides of the main chassis frame are only located on the left side of that frame on the lunar vehicles. I don't know what purpose these "brackets" served, but on the model, they are reproduced on both sides.
On the model, there are several details that are understandably simplified from the actual vehicle. The major one is the Aft Pallet Assembly and Lunar Hand Tool Carrier (LHTC). While the kit parts are more than adequate to model the LRV, some modelers might want to try to replicate this area a little more accurately. I've included several scans from NASA sources as well as the Apollo Lunar Surface Journal that should help those who wish to scratch-build
 |
| Click on the image to see more on the aft pallet |
There are several minor configuration differences that I've seen between the first two lunar LRVs. The first is that the Apollo 15 LRV's TV camera did not include the sunshade. (Another modification one might want to make on the TV camera for all versions is that the lens should not extend pass the front of the gold foiled portion of the camera.) See John Duncan's Apollo Saturn Reference Page (http://www.apollosaturn.com/) to see a shot of the camera without the sunshade attached. (This series of LRV photos is excellent if one wants to detail the tool carrying area of both the Apollo 15 and 16 rover.) Both the Apollo 16 and 17 missions carried the sunshade on the camera.
 |
| Click on the image to see more on the dust flaps |
 |
| Click on the image to see more about the Lunar Portable Magnetometer |
Here on Sven's site there are some pictures of the LRV. These are of, I believe, the 1-G training vehicle now located at the Johnson Manned Spacecraft Center and what I assume is one of the test articles at the Marshall Spaceflight Center. While generally indicative of the LRV, both of these vehicles are not true in detail to the lunar versions of the LRV. You should compare the photos to ones included in the missions galleries to find the differences in configurations. The two line drawings are, perhaps, more reveling to the modeler. The first is a stowage configuration drawing from the Apollo 15 Final Lunar Surface Procedures Manual which shows excellent line drawings of the rover and the lunar field geology equipment stowage locations. The other image is also from the above mentioned document and is a three-view of the vehicle with several of the major dimensions included. The LRV page is concluded with some renderings of the deployment of the LRV from the LM.
Karl Dodenhoff's My Little Space Museum (http://www.interaxs.net/pub/spacey/) is a great reference for several elements of this model. His LRV Gallery includes two drawings that are similar to those on Sven's site, as well as a great look of the forward side of the aft pallet assembly, its support post and two views of the Lunar Hand Tool Carrier that was used on both the Apollo 15 and 16 LRV. Also on Karl's site is a section on the Apollo Lunar Extravehicular Mobility Unit (EMU) which will be helpful with finishing the figures included with the kit. There are also pictures here on Sven's site of the EMU. Of particular interest are the shots of the Apollo 15 commander's suit. The only real complaint I have with the kit is the lack of information on painting and decaling the figures.
All in all, this is a really great kit! The build-up went relatively smoothly, the only problems I encountered were related to my unfamiliarity with the media used in the kit. I also had some difficulty with the HGA build-up. The results, however, are well worth the work. When finished, the kit looks great and you get a very complete, visually stunning replica of the LRV.
I've also included individual mission photo galleries for those of you who might wish to view some of the pictures taken on the moon of the LRV. Most of these shots are close-ups and shots not regularly seen of the Lunar Roving Vehicle.
Apollo 15
|
Apollo 16
|
Apollo 17
|
| References |
|---|
|
Apollo Expeditions to the Moon Edited by Edger M. Cortright Scientific and Technical Information Office National Aeronautics and Space Administration, 1975, NASA SP-350 |
|
Apollo to the Moon By Gregory P. Kennedy Chelsea House Publishers, NY 1992 |
|
The History of Manned Spaceflight By David Baker, Ph, D. Crown Publishers, NY 1981 |
|
NASA Technical Report TR R-401 Mobility Performance of the Lunar Roving Vehicle: Terrestrial Studies, Apollo 15 Results By Nicholas C. Costes, John E. Farmer, and Edwin B. Geroge George C. Marshall Space Flight Center, December 1972 |
|
The National Air and Space Museum Vol. Two: Space By C.D.R. Bryan Peacock Press/Bantam Books, 1979, 1982 |
|
National Geographic, September 1973 "The Final Flight" By the Crew of Apollo 17 |
|
On the Moon With Apollo 15 A Guidebook to Hadley Rille and the Apennine Mountains By Gene Simmons National Aeronautics and Space Administration, June 1971 |
|
On the Moon With Apollo 16 A Guidebook to the Descartes Region By Gene Simmons National Aeronautics and Space Administration, April 1972, EP-95 |
|
On the Moon With Apollo 17 A Guidebook to Taurus-Littrow By Gene Simmons National Aeronautics and Space Administration, December 1972, EP-101 |
|
Sightseeing, A Space Panorama, 84 Photographs from the NASA Archives selected by Barbara Hitchcock Alfred A Knopf, Publisher, NY 1985 |
|
Spacewalks By Robin Kerrod Gallery Books, 1985 |
|
Spaceflight, July 1970 "The Lunar Rover" By Henry Kudish |
10/23/98